Outsource Process
To go back to the Search screen, click Outsource Process next to Welcome at the top-right corner of the page.
Outsource Process (OS Inspection) is where parts that were sent to a supplier and received back are inspected and dispositioned. It sits after Supplier Job Work Out (send) and Supplier Job Work In (receive):
Supplier Job Work OUT (sent) -> Supplier Job Work IN (received back) -> Outsource Process (inspect and disposition).
1. Key concepts
- Total Inward Qty =
Accepted + Machine Rejection + Casting Rejection + Not Processed— the quantities declared on the selected Supplier Job Work In line item. This is the quantity to be inspected. - Inspected Qty = the number of serials placed into Accepted + Machining Defect + Machining Rejection + Casting Rejection + Not Processed.
- Sampling Size (accept number) and Rejection Sampling Plan (reject number) come from the Control Plan's Sampling Plan and are looked up for the Total Inward Qty.
- Free distribution: the four inward quantities are only the supplier's declared split. During inspection you may distribute the serials freely across Accepted / Machining Defect / Machining Rejection / Casting Rejection / Not Processed up to the Total Inward Qty — the individual buckets are not enforced.
Rejection statuses
A rejected serial can take one of three statuses. They differ in what happens after inspection:
| Status | Label | Meaning |
|---|---|---|
| Machining Defect | MD | Reviewable rejection. The serial is sent to the Rejection Assign (NCR) screen, where it can later be re-dispositioned (approved, reworked or scrapped). |
| Machining Rejection | MRJ | Terminal machining rejection. The serial is scrapped directly at this process - it skips NCR review and is booked to rejected stock. |
| Casting Rejection | CRJ | Terminal casting rejection. The serial is scrapped directly at this process - it skips NCR review and is booked to rejected stock. |
2. Add an Outsource Process
Step 1: Open the screen
From the side menu: Production & Quality -> Operations -> Outsource Process, then click Add Outsource Process (top-right).
Step 2: Fill in the header
- Part - Control Plan
[Dropdown][Mandatory]— the part / control plan being inspected. - Supplier Job Work In
[Dropdown][Mandatory]— the inward DC the parts were received on. - Process
[Dropdown][Mandatory]— the process being inspected (e.g. Milling). - Accepted Quantity
[Number]— supplier-declared accepted quantity. - Machine Rejection Quantity
[Number]— supplier-declared machining rejects. - Casting Rejection Quantity
[Number]— supplier-declared casting rejects. - Not Processed Quantity
[Number]— quantity returned by the supplier without processing. - Inspection Date
[DateTime][Mandatory]. - Remarks / Notes
[Text].
Total Quantity = Accepted + Machine Rejection + Casting Rejection + Not Processed. Sampling is calculated for this total, not for the Accepted quantity alone.
Process selection: when supplier DC inward is mandatory, Process stays disabled until a Supplier Job Work In is chosen.
Step 3: Get Validation
Click Get Validation. The screen loads the validation area:
- Task Validation is the default tab when the process has regular (measurement) validation items.
- File Uploads is the default tab only when the process has file-upload items only.
Step 4: Task Validation (sampling)
In Task Validation Results, for each control item enter the Actual Value and click Submit for the sample serial:
- Value inside the spec limits -> the sample passes (counts toward Inspection Approved Quantity).
- Value outside the spec limits -> the sample fails (counts toward Inspection Rejected Quantity).
The lot can be approved once Inspection Approved Qty >= Sampling Size. The lot is rejected once Inspection Rejected Qty >= Rejection Sampling Plan (see Whole-lot rejection below).
Rejection Status
- A Rejection Status dropdown appears after the Task Serial No selector but only when a sample has a red (negative) validation - an Actual Value outside spec - and a serial is selected.
- Choose how the failed sample is booked: Machining Defect (default), Machining Rejection or Casting Rejection.
- On Submit, a passing sample is Accepted; a failing sample is booked to the selected status. If left unchanged it defaults to Machining Defect.
Task Serial No gate
- The Task Serial No selector is disabled until the required sampling is complete.
- Selecting or moving a serial before sampling shows:
"Please complete the required sampling quantity before selecting or moving Task Serial No."
Serial Selection — Auto / Manual
- Serial Selection is a button toggle:
- Auto — the required serials are selected automatically.
- Manual — you pick each serial yourself.
Step 5: Serial disposition (cards)
The serial disposition section stays hidden until sampling is satisfied or NP (Not Processed) is enabled. It shows five cards, one per status. Use the row buttons to move each serial to any other bucket:
Action Guide
- APV — Move to Accepted
- MD — Move to Machining Defect
- MRJ — Move to Machining Rejection
- CRJ — Move to Casting Rejection
- NP — Move to Not Processed
A summary bar shows Total Inward Qty and Inspected Qty.
- Accepted Part Serial No's — serials that passed / are accepted (move to next process on approval).
- Machining Defect Part Serial No's — reviewable rejects; sent to the Rejection Assign (NCR) screen.
- Machining Rejection Part Serial No's — terminal machining rejects; scrapped directly, skip NCR.
- Casting Rejection Part Serial No's — terminal casting rejects; scrapped directly, skip NCR.
- Not Processed Part Serial No's — serials returned to the previous process (reusable on other DCs).
Sampling-validated pieces are locked: a piece validated through sampling cannot be moved to another bucket. Its action buttons are disabled with a tooltip. This applies to both approved and rejected sampling pieces.
Inspection Date validation: the Inspection Date cannot be earlier than the previous-process completion date of any selected serial. If it is, the system blocks the save and lists the affected serials — update the Inspection Date to on/after those dates.
Step 6: NP (Not Processed) — whole lot
- The NP (Not Processed) toggle is in the master header beside the record Status and is available before sampling for Outsource.
- NP does not appear in the Task Serial No row and is not available in Special Process.
- Turn NP on to send the whole lot to Not Processed without sampling — the Task Validation section hides and every selected serial routes to Not Processed.
- Turning NP on or off resets the current unsaved serial selections, while preserving already-validated serials.
- The NP toggle disappears once sampling has started (an accept or reject is recorded).
- Fully Not-Processed inward (Accepted = Machine Rej = Casting Rej = 0, Not Processed > 0) needs no toggle and no sampling — serials go straight to Not Processed; APV/RJ on the Not Processed card are disabled; only Approve is available.
Step 7: Approve / Reject / Clear / Cancel
- Approve — enabled only when the required sampling has passed and
Inspected Qty = Total Inward Qty. Approves the lot per the disposition. - Reject — appears only once
Rejection Sampling Plan <= Inspection Rejected Qty(whole lot rejected). Hidden whenever the whole lot is Not Processed. A rejection reason can be entered. - Clear — clears the current entry (Add mode).
- Cancel — exits without saving.
A success message appears once the entry is saved.
Whole-lot rejection
When Inspection Rejected Qty >= Rejection Sampling Plan, the whole inward is rejected: all serials auto-move to Rejected, APV and NP are disabled everywhere, Approve is disabled, and only Reject is available.
3. Where the quantities go (WIP Operations report)
After you Approve or Reject, each serial appears in the WIP Operations report under the matching column:
| What you did | Where it appears in the report |
|---|---|
| Approve (Accepted) | Approved at the inspected process |
| Machining Defect | Machining Defect at the inspected process (also listed for NCR review) |
| Machining Rejection | Machining Rejection (rejected stock) at the inspected process |
| Casting Rejection | Casting Rejection (rejected stock) at the inspected process |
| Not Processed | Returned to the previous stage (its Approved quantity) |
The full outsource cycle in the report:
| Stage | Report column | Meaning |
|---|---|---|
| Supplier Job Work Out | Outsourced | Quantity sent to the supplier. |
| Supplier Job Work In | Outsource Returned | Quantity received back (the quantity you inspect). |
| Outsource Process – Approve | Approved (inspected process) | Accepted serials. |
| Outsource Process – Machining Defect | Machining Defect (inspected process) | Reviewable rejects (sent to NCR). |
| Outsource Process – Machining Rejection | Machining Rejection (inspected process) | Terminal machining rejects (scrap, skip NCR). |
| Outsource Process – Casting Rejection | Casting Rejection (inspected process) | Terminal casting rejects (scrap, skip NCR). |
| Outsource Process – Not Processed | Returned to the previous stage | Reusable on other DCs. |
Process example: if you inspect at OP30, Approved and Rejected show at OP30, and Not Processed returns to the previous stage (e.g. OP25 / Work Order). If you inspect at OP40, they show at OP40 and Not Processed returns to OP30.
Example
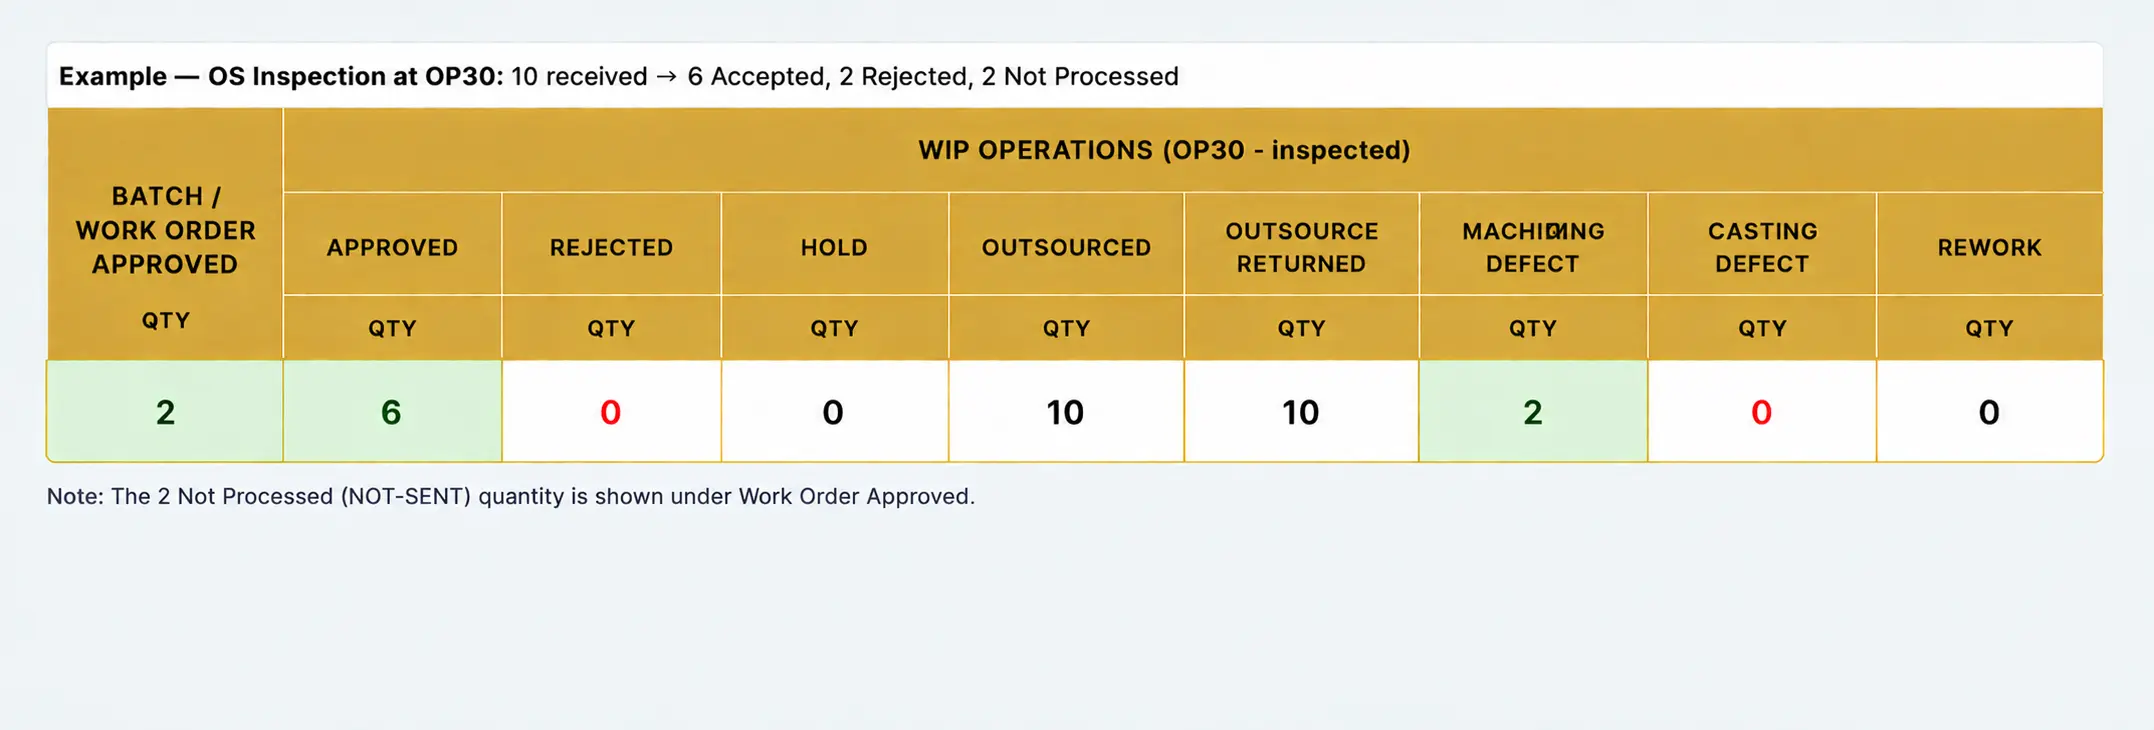
Inspection at OP30 — 10 received, dispositioned as 6 Accepted / 2 Rejected / 2 Not Processed:
- Outsourced = 10 (sent), Outsource Returned = 10 (received back).
- OP30 Approved = 6, OP30 Machining Defect = 2.
- The 2 Not Processed pieces return to the previous stage — here the Work Order (Batch / Work Order Approved = 2).
4. Search an Outsource Process
On the Outsource Process Operation search screen:
Filters
- Inspection From Date (optional)
- Inspection To Date (optional)
- Search — fetch results. Clear — reset filters.
Results columns
- S.No, View/Edit
- Supplier Job Work In, Inspection Date
- Control Plan, Control Process
- Approved Qty, Rejected Qty
- Status — DRAFT / APPROVED / REJECTED
- File Upload Status
5. Edit an Outsource Process
- Search and click View/Edit next to the record.
- Update the editable fields as needed.
- Submit to save, or Cancel to discard.
On edit of a finalised record (Approved / Rejected): the disposition cards render read-only with the saved serials — including an all-Not-Processed record showing its Not Processed serials. The editable Task Validation and selection rows are hidden.
That's it — you've learned how to add, search, and edit Outsource Process records in DMeX. For further assistance, please contact the Support Team.